このページは日本語に翻訳済みです。
テンプレートを作成する
このチュートリアルの前回の3つの章では、Typstでドキュメントを書く方法、基本的なスタイルを適用する方法、そして出版社のスタイルガイドに準拠するために外観を詳細にカスタマイズする方法を学びました。前章で作成した論文が大成功を収めたため、同じ会議のための続報論文を書くよう依頼されました。今回は、前章で作成したスタイルを再利用可能なテンプレートに変換したいと思います。この章では、あなたとあなたのチームが単一のshowルールで使用できるテンプレートの作成方法を学びます。始めましょう!
簡易テンプレート
Typstでは、テンプレートは文書全体をラップできる関数です。その方法を学ぶために、まずは独自の関数の書き方を復習しましょう。関数は何でもできるので、少し奇抜なものを作ってみませんか?
#let amazed(term) = box[✨ #term ✨]

You are #amazed[beautiful]!

この関数は単一の引数termを取り、termを✨で囲んだコンテンツブロックを返します。また、amazed対象の語が改行で✨と分離されないように、全体をボックスに入れています。
Typstに組み込まれている多くの関数には、オプションの名前付きパラメータがあります。私たちの関数にも名前付きパラメータを追加できます。テキストの色を選択できるパラメータを追加してみましょう。パラメータが指定されない場合のデフォルトの色を提供する必要があります。
#let amazed(term, color: blue) = {
  text(color, box[✨ #term ✨])
}

You are #amazed[beautiful]!
I am #amazed(color: purple)[amazed]!

テンプレートはamazedのようなカスタム関数でドキュメント全体をラップすることで機能します。しかし、文書全体を巨大な関数呼び出しでラップするのは面倒でしょう!代わりに、「everything」showルールを使用して、より洗練されたコードで同じことを実現できます。そのようなshowルールを書くには、showキーワードの直後にコロンを置き、関数を提供します。この関数にはドキュメントの残りの部分がパラメータとして渡されます。関数はこのコンテンツに対して何でも行うことができます。amazed関数は単一のコンテンツ引数で呼び出せるので、showルールに名前で渡すだけで良いのです。試してみましょう。
#show: amazed
I choose to focus on the good
in my life and let go of any
negative thoughts or beliefs.
In fact, I am amazing!

これで文書全体がamazed関数に渡され、文書をその関数でラップしたかのように機能します。もちろん、この特定の関数ではあまり有用ではありませんが、setルールと名前付き引数と組み合わせると、非常に強力になります。
setルールとshowルールの埋め込み
テンプレートにいくつかのsetルールとshowルールを適用するには、関数内のコンテンツブロックでsetとshowを使用し、そのコンテンツブロックにドキュメントを挿入します。
#let template(doc) = [
  #set text(font: "Inria Serif")
  #show "something cool": [Typst]
  #doc
]

#show: template
I am learning something cool today.
It's going great so far!

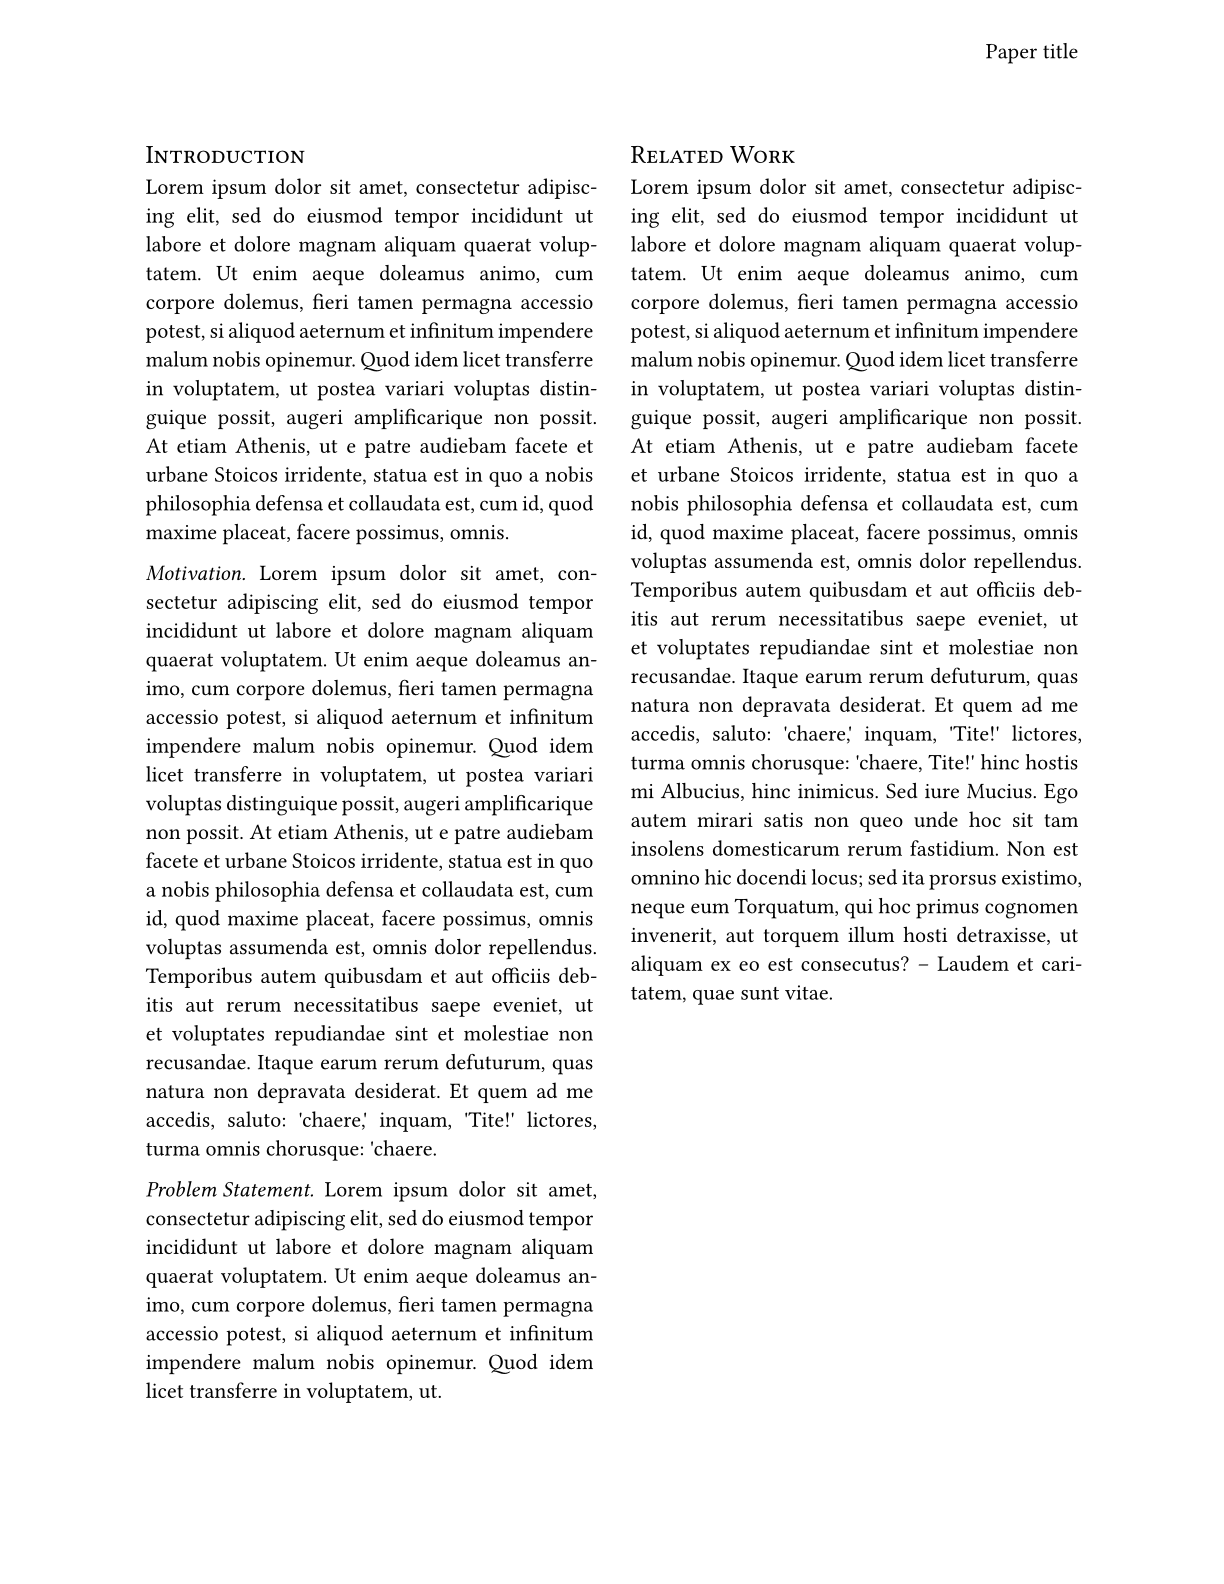
前章で発見したように、setルールはそのコンテンツブロック内のすべてに適用されます。everythingのshowルールが文書全体をtemplate関数に渡すため、テンプレート内のテキストのsetルールと文字列のshowルールが文書全体に適用されます。この知識を使って、前章で作成した論文の本文スタイルを再現するテンプレートを作成しましょう。
#let conf(title, doc) = {
  set page(
    paper: "us-letter",
    header: align(
      right + horizon,
      title
    ),
    columns: 2,
    ...
  )
  set par(justify: true)
  set text(
    font: "Libertinus Serif",
    size: 11pt,
  )

  // Heading show rules.
  ...

  doc
}

#show: doc => conf(
  [Paper title],
  doc,
)

= Introduction
#lorem(90)

...

コードの大部分は前章からコピーペーストしました。2つの違いがあります。
-
everythingのshowルールを使用して、すべてを
conf関数でラップしました。この関数はいくつかのsetルールとshowルールを適用し、最後に渡されたコンテンツをそのまま出力します。 -
さらに、コンテンツブロックの代わりに中括弧で囲まれたコードブロックを使用しました。この方法では、すべてのsetルールや関数呼び出しの前に
#を付ける必要がなくなります。代わりに、コードブロック内に直接マークアップを書くことはできなくなります。
また、タイトルがどこから来ているかに注目してください。以前は変数に格納しましたが、今はテンプレート関数の最初のパラメータとして受け取っています。そのために、everythingのshowルールにクロージャー(その場で使用される名前のない関数)を渡しました。conf関数は2つの引数(タイトルと本文)を期待しますが、showルールは本文のみを渡すからです。したがって、論文のタイトルを設定し、showルールからの単一パラメータを使用できる新しい関数定義を追加します。
名前付き引数を持つテンプレート
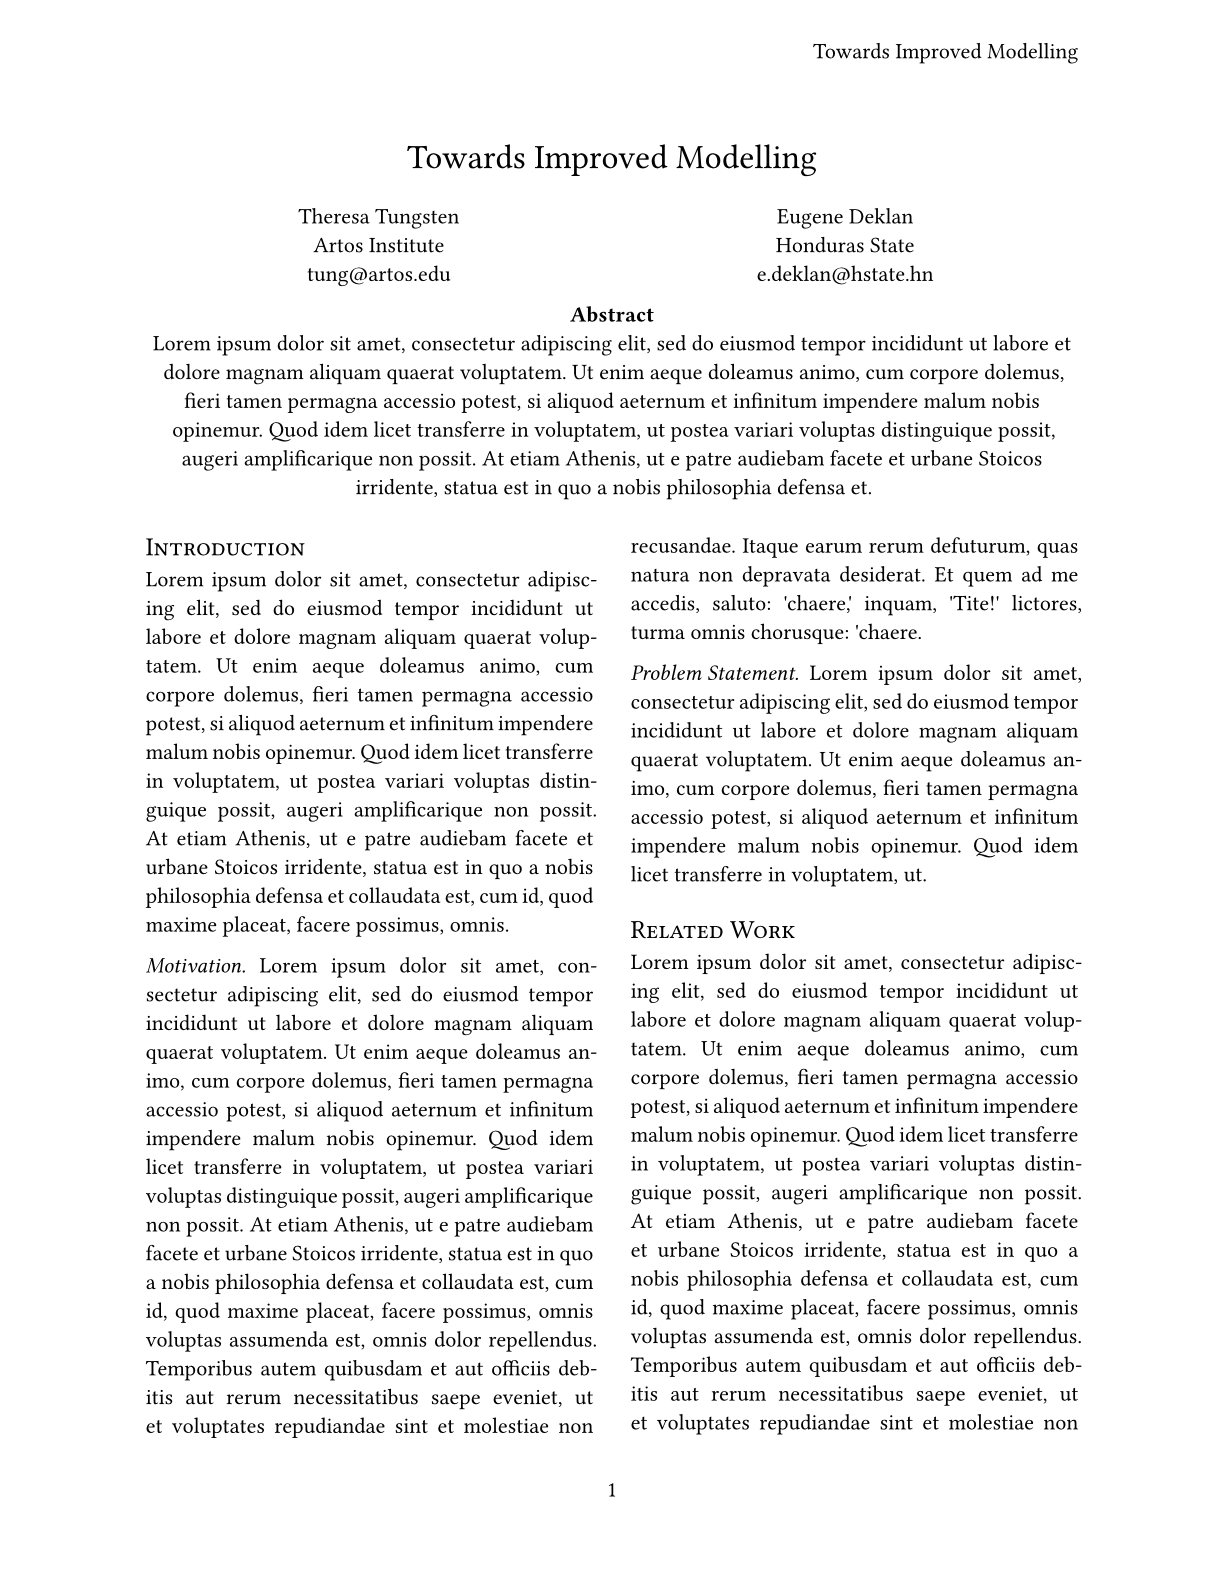
前章の論文にはタイトルと著者リストがありました。これらの要素をテンプレートに追加しましょう。タイトルに加えて、所属機関を含む著者リストと論文の要約をテンプレートに受け付けるようにします。可読性を保つために、これらを名前付き引数として追加します。最終的には、次のように機能させたいと思います。
#show: doc => conf(
  title: [Towards Improved Modelling],
  authors: (
    (
      name: "Theresa Tungsten",
      affiliation: "Artos Institute",
      email: "tung@artos.edu",
    ),
    (
      name: "Eugene Deklan",
      affiliation: "Honduras State",
      email: "e.deklan@hstate.hn",
    ),
  ),
  abstract: lorem(80),
  doc,
)

...
この新しいテンプレート関数を構築しましょう。まず、title引数にデフォルト値を追加します。これにより、タイトルを指定せずにテンプレートを呼び出すことができます。また、空のデフォルト値を持つ名前付き引数としてauthorsおよびabstractパラメータを追加します。次に、前章からタイトル、要約、著者を生成するコードをテンプレートにコピーし、固定の詳細をパラメータに置き換えます。
新しいauthorsパラメータは、name、affiliation、emailというキーを持つ辞書の配列を想定しています。任意の数の著者を持つことができるため、著者リストに1列、2列、または3列が必要かどうかを動的に決定します。まず、authors配列の.len()メソッドを使用して著者の数を決定します。次に、列数を著者数と3の最小値に設定し、3列以上作成しないようにします。3人以上の著者がいる場合は、代わりに新しい行が挿入されます。この目的のために、grid関数にrow-gutterパラメータも追加しました。そうしないと、行同士が近すぎてしまいます。辞書から著者の詳細を抽出するには、フィールドアクセス構文を使用します。
各著者についてグリッドに引数を提供する必要があります。ここで配列のmapメソッドが便利です。これは引数として関数を取り、その関数が配列の各アイテムで呼び出されます。各著者の詳細をフォーマットし、コンテンツ値を含む新しい配列を返す関数を渡します。これで、グリッドの複数の引数として使用したい値の配列ができました。spread演算子を使用してこれを実現できます。これは配列を取り、その各アイテムを関数の個別の引数として適用します。
結果のテンプレート関数は次のようになります。
#let conf(
  title: none,
  authors: (),
  abstract: [],
  doc,
) = {
  // Set and show rules from before.
  ...

  set align(center)
  text(17pt, title)

  let count = authors.len()
  let ncols = calc.min(count, 3)
  grid(
    columns: (1fr,) * ncols,
    row-gutter: 24pt,
    ..authors.map(author => [
      #author.name \
      #author.affiliation \
      #link("mailto:" + author.email)
    ]),
  )

  par(justify: false)[
    *Abstract* \
    #abstract
  ]

  set align(left)
  doc
}
別ファイル
多くの場合、テンプレートは別のファイルで指定され、それからドキュメントにインポートされます。この方法では、メインファイルはすっきりとし、テンプレートを簡単に再利用できます。ファイルパネルでプラスボタンをクリックして新しいテキストファイルを作成し、conf.typという名前を付けます。conf関数定義をその新しいファイルに移動します。これで、showルールの前にインポートを追加することで、メインファイルからアクセスできます。importキーワードとコロンの間にファイルのパスを指定し、インポートしたい関数に名前を付けます。
テンプレートの適用をより洗練させるためにできるもう1つのことは、関数の.withメソッドを使用して、すべての名前付き引数を事前に設定することです。これにより、クロージャーを記述してテンプレートリストの最後にコンテンツ引数を追加する必要がなくなります。Typst Universeのテンプレートは、この関数呼び出しのスタイルで動作するように設計されています。
#import "conf.typ": conf
#show: conf.with(
  title: [
    Towards Improved Modelling
  ],
  authors: (
    (
      name: "Theresa Tungsten",
      affiliation: "Artos Institute",
      email: "tung@artos.edu",
    ),
    (
      name: "Eugene Deklan",
      affiliation: "Honduras State",
      email: "e.deklan@hstate.hn",
    ),
  ),
  abstract: lorem(80),
)

= Introduction
#lorem(90)

== Motivation
#lorem(140)

== Problem Statement
#lorem(50)

= Related Work
#lorem(200)

これで会議論文を、その会議用の再利用可能なテンプレートに変換しました!フォーラムやTypstのDiscordサーバーで共有して、他の人も使えるようにしてみてはいかがでしょうか?
まとめ
おめでとうございます!Typstのチュートリアルを完了しました。このセクションでは、独自の関数を定義する方法と、再利用可能なドキュメントスタイルを定義するテンプレートを作成・適用する方法を学びました。あなたは多くを学び、ここまで来ました。これでTypstを使用して独自の文書を作成し、他の人と共有することができます。
私たちはまだ非常に若いプロジェクトであり、フィードバックを求めています。質問、提案、またはバグを発見した場合は、フォーラム、Discordサーバー、GitHub、またはウェブアプリのフィードバックフォーム(ヘルプメニューからいつでも利用可能)でお知らせください。
さっそくサインアップして何か書いてみましょう!